Glassing the Hull

Take a deep breath. This is easily a 3-4 hour job. After cut the cloth to length and drape it over the inverted hull, it drapes just like the instructions say. The bow drapes smoothly (after several passes of hand rubbing to pull the weave down and forward) and the stern is a wrinkle.


I deviated from the instructions on the stern. It seemed to me that you could cut the cloth in a way that would allow about 3" of overlap on each side. This required glassing one side and then glassing that piece's overlapping edge around the stern and onto the hull on the other side. Then the opposite side was glassed and it's overlapping piece glassed over the top of the other overlap and around to the first side. The key here was to make sure the first overlap was wet and tight to the hull, because there is significant moving of the cloth to get it wrinkle free and you don't want the underneath piece to move.


You can't avoid a little bald spot at the point where the stern curn makes its sharpest inflection from the bottom of the hull to the actual stern. As a matter of fact, if you elect to overlap the cloth at the stern, you will most likely have to cut the wet cloth a little higher than you estimated when it was dry, putting the bald spot a little further along the keel. But the bald spot trims out nicely with the scraper (and very little sanding) and will later be covered with the sacrificial tape along the keel.

When the glassing is finished, you can barely see the overlap at the stern (it's just an inch inside the dotted line). Don't wait too long to cut the draped cloth from the edge of the hull. It comes of nicely with a razor blade after about 10 hours. It's a real pain after 20 hours.

Gluing the Hull


You've already used the resin when you put the panels together. When you glue the hull together, using the syringe and the difficulty of getting the glue into the seams just adds to the challenge. It's almost a panic when you realize that you're making a mess and the glue is getting all over the outside of the hull. Don't panic. The discoloration will disappear almost entirely when you do a full resin coat on the hull. The drips of glue, however, will add significantly to the amount of work you need to do to get the hull ready to glass.


So, three rules. First, don't let the short pot life make you rush to apply the glue. Second, wipe up the drips as much as possible. Third, put glue on the seams, even when it seems that they are so tight that no glue is getting in. It is. Maybe not great, but some does get in. Some seams will be tight, even if you don't do much of a chamfer on the edges of the panels.


The bow and stern joints need to be filled with resin that is thick enough not to run. You eventually will sand these joints to round them out, without sanding through the top layer of the okume. As you can see in the above photo, these panels weren't chamfered very much at their ends, so the joint is relatively wide and requires lots of fill. Consequently, the fill was high enough to cover some of the wires. This looks like a bad thing--when the wires are pulled the fill will break, possibly digging out a hole big enough that the edge can't be faired in without repairing the hole(s) with more fill. This isn't a structural problem, it just adds another cure cycle to your schedule. As it turned out, the resin did break, but the seam faired in just fine. Lucked out, for sure.

Tip 7: To avoid a wide, bulging need for fill at the bow and stern, the panels should be aggressively chamfered in this area to make for a more narrow joint.

Tip 8: The bow and stern wires should have their twists over to the side so that when they are removed, the wire can slide through the built-up resin, leaving only a small hole.

Tip 9: If your joints are too tight and you are not confident of the glue, let the hull cure, then turn it over before you remove the wires and fill the inside of the seams. In the case of the Arctic Tern, I chamfered the joints at too shallow an angle, eg, making a knife edge on the panels, which caused two problems--the joints were tight on the outside and open (a wide "V") on the inside. Filling the joints from the inside solved both of these issues.

It's time to pull the wires. If you didn't fill the seams on the inside, you can pull them after 10-12 hours and the resin will still be relatively soft. If you have to wait for the inside to cure, the outside resin will be quite a bit harder and more difficult to scrape, but it can still be done. Now you can get at the seams and scrape away the thickened resin that is invariably gooped up along the seams. This is where the scrapers are invaluable. Be careful if the resin is hard--you can pull off the top veneer layer of the okume. For thick or hard resin, scraping with the blade at a 45 degree angle to the direction of travel will help cut the resin without pulling it off in a lump.

The next big step is to coat the outside with resin. If you have taken care to scrape (and a little sanding) the hull smooth, it will make all subsequent steps easier. So spend a little time getting the hull smooth. You don't have to remove the glue stains--they will disappear in the resin coat.

Tip 10: Make sure you have a short roller to apply the resin to the hull. Home Depot sells on with a foam roller included. Throw the roller away and cut the 1/8" thick rollers available from Pygmy to fit (either in half or thirds). The advantage of the cheapie roller from HD is that the roller cage is very loose on the handle and will not lock up on you due to cured resin--you can use it over and over if you clean it a little after each use. You really need to have a roller that is easy to roll--the resin is slippery and most rollers have too much turning friction.


Getting Ready for Resin

Timeline so far--4 days to glue the panels to length. 3 days to wire the hull together and insert the forms.

Did I mention that the strongback is only 2' wide? Three feet would have been better, but only because it would have cut the panel gluing down to 2 days. After that, the 2' width is fine.


Tip 6: Before you start using the resin, get yourself a Bahco scraper. These tools can take every drip and sag down to flush (or down to wood, so use some caution). The blade is carbide, so it remains sharp, like, forever. And it's reversible. For $15, this is the best tool in the whole shop, considering the time it saves, maybe it even makes some smoothing tasks possible. Don't even think of buying a spare blade--at $12 for a blade and $15 for the tool, get two of them. I also recommend the small scraper with the triangular blade--it can safely scrape areas that are too narrow for the 2" model.

Here in Colorado, even in the summer, the shop rarely gets above 76 degrees and is more often in the mid-60s. The shop floor can be a little below 60. In these conditions the medium speed hardner begins to gel the resin in 18-20 minutes. For some applications it is OK to use up to 30 minutes, but if you need to flow resin (as a glue) into a seam, I'd plan on 15 minutes. Setting the bottles of resin on the cool floor was just cool enough to cause crystallization. The small difference in temperature obtained by setting them up on a table prevented this. But even then the hardner was almost too viscous to pump. Putting the resin under a box with a 17 watt light cured that problem.

As you get ready to glue the hull together, you might want some additional materials. The small cruved-tip syringes are great for applying the thin resin, even with some wood powder mixed in. But it's damnably difficult to fill them with the thickened resin. I recommend buying 20 additional small syringes and 5-10 larger ones, about 60cc. Use the small syringers for gluing and the larger ones for filling the joints, especially the exterior bow and stern where you need to round the seam. One of the real advantages of the larger syringe is that you can pour a whole 1-1/2 oz mix in them at one time. So, for two kits, get the following (approximately) and adjust appropriately for one kit:

   cups    -- 150
   gloves -- 150 pair
   popsicle sticks -- 100 wide, 50 narrow
   paper towels, blue industrial shop -- 5 rolls
   6 oz glass tape -- one extra 7.5 yard roll
   cab-o-sil -- one gallon (works like wood dust, but smoother)
   wood flour -- one extra bag
   syringes -- 20 additional curved-tip, small
                   -- 5-10 each, approximately 60cc, large

You'll find that you throw almost everything away after one use, for two reasons. First, the acetone costs more than the article you're cleaning. Second, you should avoid skin contact with acetone as much as practical. So you're going to go through a lot of gloves and cups.

If you tape all the deck seams behind the coming, particularly the ones that are also covered with 4" strips of cloth, you'll run out of tape. Also, if you have the hatch kit, you may need additional tape.

The cab-o-sil works like the wood flour, but provides a smoother finished surface in the fill areas. Mix it 1:3, cab-o-sil to wood flour, in your thickened resin.


This next comment applies to the deck--pay close attention or you'll need 5 yards additional 6 oz fiberglass cloth! When you cut the pieces for the deck, it may appear that you can save a 20" or so chunk for glassing things like the coming and the bulkheads (if you bought the hatch kits). Don't be tempted. Even though the length appears addequate, it turns out that roughly in the middle of the length, the remaining piece will be too narrow.

What is happening when it is done wrong is you are putting the point of the red triangle on the stern and then cutting accordingly--the corner of the cloth and the point of the red triangle coincide. To do it right you should put the wide end of the cloth at the middle of the coming and trim--then you get a pattern as shown in the top box and the remaining triangle of cloth will be wide enough to cover the bow end. This is not clear in the kit instructions. John Lockwood is aware of this and is editing the instructions, but just make sure you do this correctly, whether or not you've got a new edition of the instructions.

The cloth is not very expensive. If you want to entirely avoid a cloth joint/overlap in the area of the coming, just buy 6 yards of extra cloth and do the deck in one piece.

You may want to have some extra resin on hand. I needed about 1 additional quart. I don't know if this was because I had a lot of waste in all those partially full cups, which were thrown away, or because I did too much fill, or maybe too big a bow pour. I haven't weighed the boats, so I don't know if the resin is on the boat or in the trash.

Getting Started


You can build these kayaks without a special long table (strongback), but if you have the room, I recommend that you build one. The cost is quite minimal--two sheets of 1/2" CD plywood and three 12' 2x4s. You might also want to build two saw horses for legs or you can put the strongback on top of an existing support (I used my table saw and outfeed table).  The ropes and pulleys were intended to make it possible to get the strongback up against the ceiling and out of the way. It didn't turn out to be that useful--once you get started you tend to use the strongback continuously.


The kit comes in an 8' box. The first step is to glue pieces together to make the 17' panels. This was one of two steps in the kit process where the strongback was very helpful. I don't think I would have been quite as confident of the alignment of the individual pieces without a flat surface where I could secure each piece of the panels. I used most anything I could get my hands on for weights on the joints. I also, per the instructions, used small finishing nails to secure the panels once they were aligned. Ouch--I didn't like putting the holes in the panels.

Tip 1: When gluing the panels together, turn them over at least once and look for plywood stamps on the other side. If you start gluing without doing this, you may soak the ink in resin and make it difficult to sand out.

Tip 2: Chamfer the edges of the panels. You'll find that trying to align and hold the sharp edge of the panels exactly matched as you wire is exceedingly difficult. A nice bevel will make the task much easier. You can do this with a file or small hand plane. The angle isn't critical, but you can estimate the half-angle that matches the boat shape just by looking at these photos. CAUTION: the okume has three obvious layers. Chamfer only through two of them. You can chamfer all the way to a sharp edge, if you're careful, but you'll find later that if you get a really tight joint, you can't introduce resin into the seam. So a tight joint (where the outside edges of the two panels meet without any exposed "V") isn't the best idea. From experience, I found that the resin will still go into the joint, but it makes the job much harder.

The kayak shape comes together quite easily as the panels are attached to the forms. The strongback is helpful, but there is no requirement to specially support the hull to keep it flat or straight. On the other hand, some support is a good idea, if just to keep the stresses low so as not to introduce twist or sag.

Tip 3: It takes less hot glue than you think to hold the forms in place. Less than an inch in 4 places, on one side, is sufficient. When it comes to removing the forms, you will regret using too much.

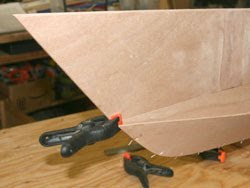
Tip 4: As you wire the panels together, if you're doing it solo, you'll find the use of helper clamps necessary. This is true to keep the panels aligned at the ends and later to help hold the bow and stern tight.

Tip 5: Make sure you double check the alignment of the joints in the panels. It is very easy to move them 1/8" or so without noticing. OK, now check them again. Now you've wired about half the length, check them again.


With the hull fully wired together, you'll add braces to the tops of the forms and invert the hull in order to glue the seams. In the Tern, the braces ensure that you don't have any twist, so the strongback is the simplest way to give you confidence. Using saw horses that have been leveled is an alternative, but how do you know you haven't moved them slightly? It may be obvious in the above photo that the aft form isn't vertical. This was not obvious until the braces were attached. There's no excuse for this in the tern, since the center of the hull is flat. In the Coho, which has moderate "rocker" in the hull, it's a little more difficult to determine what "vertical" is.

Introduction

I've wanted to build a stitch and glue kayak since I saw one on the beach in Oregon three years ago. I rowed racing shells in Boston a few years back, but the real objective was to build this elegant and beautiful boat. Perhaps it would never get wet, but there was something here that would scratch my woodworking itch. There was some initial trepidation about skills--I had never done any fiberglass, even though I had an extensive workworking shop. So, after several trips to the Pygmy sales office in Port Townsend, in May 2009 I finally bought an Arctic Tern and my partner bought a Coho. As an inducement, Pygmy threw in free passes to the Kayak Festival that would happen four months later in September. The project, without any intent on my part, had now moved from the status of an art piece to the status of a serious effort to be on the water at the festival. The trick would be to get back to Colorado, build the boats, and then get back to Port Townsend. Nothing as cool as the Paddle to Seattle, but the pressure was on.